CLINICAL
Flash a smile
Dr Yasmin Shakarchy and Dr Minesh Patel give you a crash course in producing expert images of your dental work
DR YASMIN SHAKARCHY
Dr Yasmin Shakarchy completed her dentistry training at the University of Birmingham. She is a Member of the Faculty of Dental Surgery (MFDS Ed) and holds a a PG certificate in aesthetic and restorative dentistry. She won Best Young Dentist at the 2018 Dentistry Awards. Instagram: @doctor_yasmin_
DR MINESH PATEL
Dr Minesh Patel has a Masters in Aesthetic Dentistry from Kings College London. He has also completed a one-year post-graduate course on the placement and restoration of dental implants as well as a PGC in periodontology. Dr Patel developed one-day dental photography training course f:ocus, on which he has trained many leading dentists in the UK.
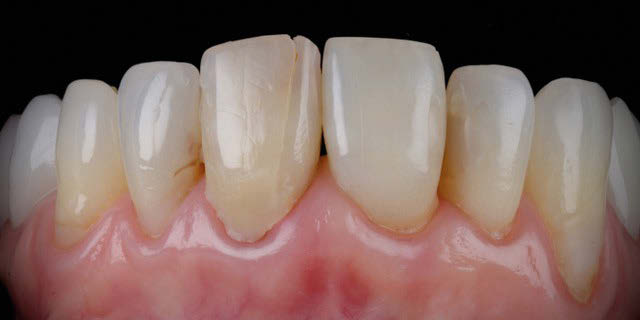
Fig 1a: Before crown
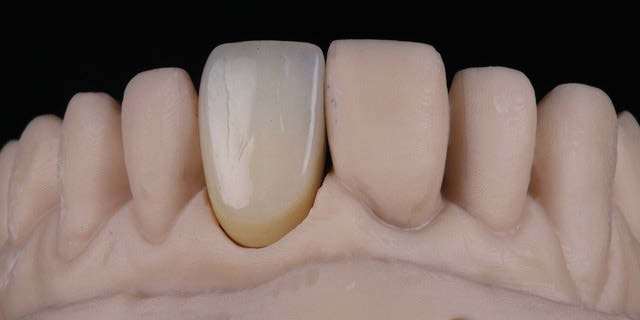
Fig 1b: Crown on model
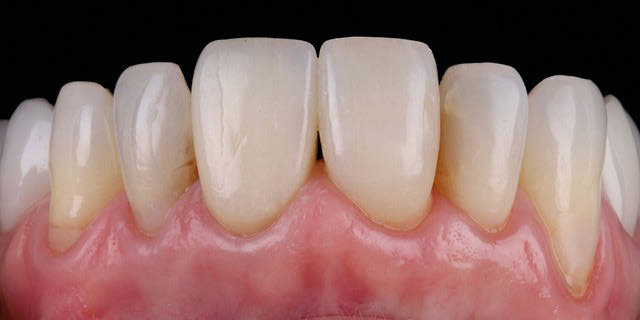
Fig 1c: After placement of crown
Since the introduction of the modern-day camera, photography has always played a crucial role in dentistry. While its purposes were initially for case documentation and referral, dental photography evolved into a means of patient education and showcasing work to potential patients.1 There are several factors which produce not only good photos, but great ones. This does not include editing, which we do not advocate, as editing such things would mar the realistic work the clinician can achieve, and mislead patients desiring treatment.
USES OF DENTAL PHOTOGRAPHY
Beyond case documentation and referral information, there are a multitude of new reasons why good-quality photography is important. Firstly, in the fast-paced world of the internet, accessing information is becoming ever easier. With such access comes advertising and marketing, now found on social media platforms where patients seem to decide upon their dentists. There is even the concept of social media becoming the new Google to consider.2 Work shown on these platforms forms a key part of patient opinions when deciding on potential dental professionals or indeed, treatment options.
While the quality of dentistry is the most important factor, this would ultimately be of little use without appropriate photography and presentation. Many dentists on social media can attest to the fact that their accounts have grown significantly based on the quality of their digital content, of which a majority is dental work.3 Moreover, when patients seek dental treatment, they typically request a portfolio. This is a means for patients to understand the quality of work and their own potential transformations or outcomes. Social media is also a great platform for dentists to share their work with peers and colleagues. Now more than ever, a creative, artistic aspect of photography is on the rise, and slowly becoming not only desirable, but essential.
While often overlooked, a key use of dental photography is when communicating shade with a laboratory. Admittedly, there are multiple ways to show and communicate shade, however without good-quality photography and lighting, the technician would struggle to appropriately decipher shade, as well as the subtleties of dental restoration. This is particularly important for single anterior tooth restoration, where matching to the adjacent teeth is essential for a great aesthetic outcome4 (figures 1a, 1b and 1c). Cross-polarised photography is a revolutionary system which aims to get a better assessment of shade and characteristics of a tooth for those anterior teeth that require a great level of detail or direct composite restorations with layering. With this technique, polarising filters are required, which sit over the lens and flash of the camera via magnetic attachments. The device eliminates any reflections, and accentuates all the details, characteristics and shade changes within the tooth. Photos are taken with shade tabs besides the tooth. Further to this, the ELAB technique utilises special software to aid matching the single crown to adjacent teeth using this method of crosspolarisation. This is all done without the physical presence of a lab technician and depends solely on photography (figures 2a and 2b).
BASIC EQUIPMENT NEEDED
It is a great misconception that behind every good dental photo is a range of expensive camera, lighting and adjunct equipment. In order to capture a beautiful photo, the real value lies in the understanding of lighting principles. There is some basic equipment required for digital photography in dentistry for which there are many different options but as standard, the set up needed would be:
• DSLR camera body
• Camera lens
• Flash combinations5
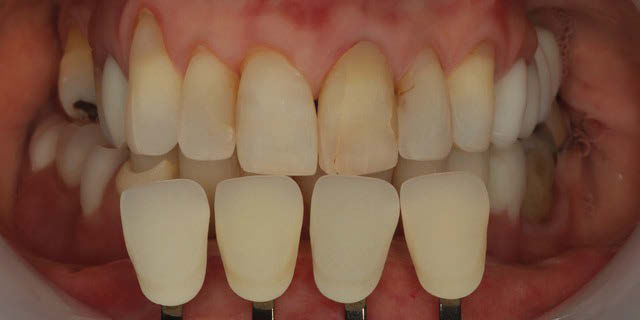
Fig 2a: Cross-polarising filter
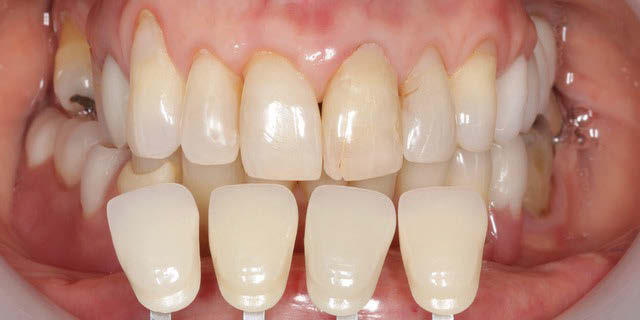
Fig 2b: Without cross-polarising filter
We generally recommend Canon or Nikon models alongside their flash combinations. As for the particular models, ranges and settings, this is outside the scope of this article; in our opinion the choice of camera setup is based largely on ease of use for the clinician.
CONSENT AND STORAGE
It is paramount to follow the General Dental Council (GDC) social guidance document in regard to the consent and storage of patient images. The clinician must obtain both verbal and written consent from the patient for the use of their photos and the method of storage. The patient must give specific consent to the use of their photos on social media as a “before and after”, and personal information must not be disclosed unless otherwise specified, i.e. the patient being “tagged” in the photos. They must understand that when posted on social media, there is no control over copy and redistribution of these photos by others.
If identifiable views are used, i.e. full-face photos, this must be separately consented to. With all images, patients must be informed that they have the right to withdraw their consent at any point. Regarding storage of photos, it is best that they are stored on a password-protected computer, laptop or secure server and that no personal information is attached to these photo6-9
Images produced, particularly those taken as a photo series over the course of the patient’s treatment journey, must be reproducible in that the exact framing, position and lighting must be reproduced in the “after” photos so that a concurrent series can be followed, and the journey documented accurately. Too often, we see before-and-after photos where the lighting is completely different, and often that can be misleading as to the results achieved, particularly when judging the colour of the end result.
Therefore, we must standardise our photographs by ensuring our camera settings are the same so as to limit the variables. This guarantees the conditions in which the photos are taken are set, and so an accurate image of the results can be seen and compared with the original presentation of the patient10
“While the quality of dentistry is the most important factor, this would ultimately be of little use without appropriate photography and presentation”
THE THREE PRINCIPLES OF LIGHT
Understanding the following three principles and how they work together is essentially the key to producing beautiful dental photos.5
Diffusion
A naked light, primarily known as a harsh light output, is produced from a direct light source such as a flash. Diffusion of light can be achieved by essentially modifying the flash light. This involves placing something over it to spread the light evenly across a wider range. It creates a softer light which is more aesthetic and pleasant on photos. When showcasing dental work, particularly in the anterior zone, we want surface textures to be highlighted. The ideal is to strike a balance between a photo that captures all the surface texture while looking realistic.
Soft boxes can be placed over the flash to achieve this. These are essentially designed from a special type of material or fabric whereby light is scattered through it and becomes softer. The larger the diffuser used, the greater the degree of diffusion and the softer the image will appear11 However, using overly large diffusers is not only impractical, but also leads to poor posterior lighting and images that can look too false.
The f:ocus course aims to help delegates understand the modalities of light and how to produce images with excellent reproducible quality with good record keeping, professional presentation and communication in mind. The f:ocus bounce cards are a versatile set of diffusers that are provided on the course that allow the user to produce beautiful anterior and posterior images. They are designed to work with popular and good-quality ring and twin flashes for both Nikon and Canon camera setups (figure 3). They can be adjusted for different levels of diffusion and easily removed for bare flash and cross-polarised photography.
Fig 3: Bounce card diffusion
Fig 4a: Ring flash
Fig 4b: Twin flash
Distance
To ensure optimum diffusion, the source of the light needs to be kept close to the subject. This ensures that the ideal quantity falls on the teeth, with a reduced risk of light scatter. The ideal working distance will depend on the camera and lens setup. When using smaller soft boxes, ensure you are as close to the subject as possible, thereby providing better diffusion. The varying degrees of opacities of the diffusing medium, as well as the size of these, will create varying degrees of softness within the final image. Using larger soft boxes or flash modification may mean working from a greater distance to the subject, however this may not be practical in everyday dental photography11
Direction
The direction of light will determine how the teeth are illuminated. There are two types of flash setups in dental photography; ring flash or twin flash. A ring flash gives a good, powerful level of light typically used to reach posterior teeth. It is one light source with 360-degree coverage, positioned directly in front of the subject, but produces less anatomy and surface detail of the teeth.
Alternatively, using two separate mini-flashes or “speed lights” offers more flexibility in capturing surface texture and anatomy. The source of light is at two separate points, angled at 45 degrees to the subject. As a result, the light falls on the teeth in a more aesthetically pleasing manner, particularly in the anterior zone. This type of twin flash set up can be with a lens mount, wired or wireless, or used in combination with a flash bracke11 (figures 4a and 4b).
Different light provides different information. Bare flash is good for basic shade tab communication to a lab. Soft light is good for texture and anatomy, while polarisation is best for internal details.
As a dental clinician with ever-evolving knowledge and skills, having a basic understanding of dental photography is simply not enough. With photos of dental work being showcased on so many different mediums and platforms, the quality of photography in our profession needs to be high, and the importance of having this skill cannot be undervalued. How best to achieve a beautiful dental photo depends partly on the equipment and setup used, but mainly on a solid understanding of the key principles and their correct application.
References
1. Kalpana D, Rao SJ, Joseph JK, Kurapati SKR. Digital dental photography. Indian J D Res. 2018 Jul-Aug;29(4):507-512
2. Peltier B, Curley A. The ethics of social media dental practice: challenges. J Calif Dent Assoc. 2013 Jul;41(7):499-506
3. Ahmad I, Digital dental photography. Part 2: purposes and uses. Br Dent J. 2009 May 9;206(9):459-64
4. Lazar R, Culic B, Gasparik C, Lazar C, Dudea D. The accuracy of dental shade matching using cross-polarization photography. Int J Comput Dent. 2019;22(4):343-351
5. Shorey R, Moore K. Clinical digital photography: implementation of clinical photography for everyday practice. J Calif Dent Assoc. 2009 Mar;37)3):179-83
6. Stieber JC, Nelson T, Huebner CE. Consideration for use of dental photography and electronic media in dental education and clinical practice. J Denta Educ. 2015 Apr;79(4):432-8
7. Naidoo S. Informed conset for photography in dental practice. SADJ. 2009 Oct;64(9):404-406
8. Peltier B, Curley A. The ethics of socialmedia in dental practice: ethical tools and professional responses. J Calif Dent Assoc. 2013 Jul;41(7):507-13
9. GDC Guidance on using social media (2013) Available at https://standards. gdc-uk.org/Assets/pdf/Guidance%20on%20using%20social%20media%20 (Sept%202013).pdf (Accessed: 20th September 2020)
10. Snow SR.Assessing and achieving accuracy in digital dental photography. J Calif Dent Assoc. 2009 MAr;37(3):185-91
11. Ahmad I. Digital dental photography. Part 5: lighting. Br Dent J. 2009 Jul 11;207(1):13-18 13–18(2009)Cite this article
