CLINICAL PHOTOGRAPHY
See the light
Clint Singh on why LED ring lights don’t work for clinic photography
CLINT SINGH
Clint Singh has brought his wealth of photography knowledge to the aesthetics market with Clinical PhotoPro.
The company creates photography products to solve problems in the industry. He also runs CPDaccredited training centred around helping clinics to achieve standardised photography.
Documenting patients photographically is your only true testament to your work and is an integral part of your clinic workflow. This process should be quick and easy, letting you maximise your time with your patient. We need these images for patient review, for marketing, and most importantly, we need high-quality images to fall back on if ever needed for litigation.
When comparing before and after images, they need to be identical in every way so that the work carried out is clearly seen. These images need to be of the highest quality, with true-to-life colours representing realistic skin tones.
A popular light source for clinics is LED ring lights, however, more often than not, the photographs produced when using them look unnatural. Images might be partially lit, appear overexposed, lack detail or have hot spots making it impossible to see detail and thereby making the documentation pointless.
Not only does this limit you when it’s time to review the patient’s progress, but the images may not show sufficient detail if needed as evidence for your insurance company or to protect you in litigation.
To better understand why LED ring lights are inadequate, we first need to understand how cameras work when used with ring lights. Smart devices are commonly used in clinics as their settings are in automatic mode. All the user must do is decide on which area of the subject is being photographed to capture the image. With a camera in auto, an average light reading of the scene is taken, as the algorithm determines which settings to use. The colour and strength of this light are therefore critical in how the camera ‘decides’ the outcome of the exposure and the image’s colour.
SEEING DETAIL IN THE SKIN
When light is placed at an angle to the skin, it throws shadows on the surface. This is what lets you see detail. The light source should be placed at forty-five degrees to the area being photographed and with the camera. As this angle decreases, the angle of the shadows on the surface becomes less, letting you see less detail.
Flat light is light that illuminates the patient from the same angle as the camera. In this case, as light falls onto the skin, the angle to the surface and the camera is zero. As a result, there are no shadows on the surface of the skin, so this type of light tends to flatten any detail.
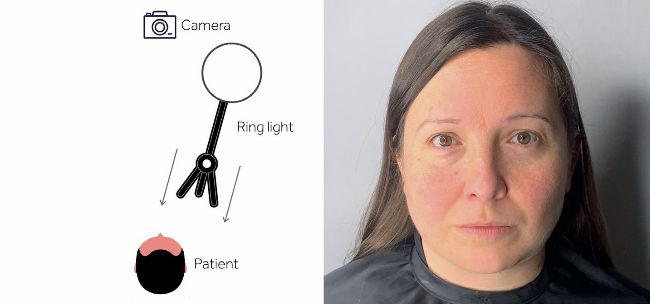
A common setup when using an LED ring light is to shoot through the ring to illuminate the subject fully. The camera and the light are now at the same angle, and the detail in the skin is lost. This type of lighting works well for fashion photography, as it hides imperfections and flaws in the skin, but is not suited for the aesthetic industry as we need to see as much detail in the skin as possible. If we reposition the ring light and the camera, we are faced with another problem.
With the ring light placed at an angle to the subject, the patient is only partially lit. The camera takes an average light reading of the entire scene. One area is well-lit, and one is in shadow, so the camera will try and correctly expose the overall image. The result is that the well-lit area will be overexposed with a loss of detail in the skin. In this example, the right side of the image had no additional lighting, and the room was dark.
Another common scenario is to use the same setup in a room that is lit with natural light. While it is welcoming to have rooms with natural light from big windows, the biggest cause of inconsistency with photographic patient documentation is light from outside. The strength and colour of natural light constantly change throughout the day, making it very difficult to get consistent results. With the patient being partially lit with the ring light and partially lit with natural light, the camera will yield images of varying quality and colour between sessions.
MAINTAINING CONSISTENCY
Consistency in clinical photography is vitally important, but maintaining consistency with LED ring lights is extremely difficult. For accurate patient documentation, we require images that are true-tolife with realistic skin tones. To determine neutral colour, the camera uses the white balance setting (colour temperature is how warm or cool the light is). Natural light will change during the day, from blue before sunrise, to a yellowish-orange light at sunrise, to a neutral colour around midday.
The opposite colour changes happen as we head towards the evening. Some LED ring lights have the option of changing the colour of this light. Although this may be seen as an advantage to customise your images, adding another variable only adds to the difficulty of maintaining consistency.
LED ring lights are designed to be used with tripods to make them mobile and convenient.
However, the height adjustment feature highlights another issue that makes them unsuitable for clinics. Light follows an inverse square law: if we double the distance between the light source and the patient, the amount of light falling on the patient isn’t halved - it is quartered.1To achieve absolute consistency, the distance between the light source and the patient needs to be the same, with the slightest difference resulting in images of different exposures. The LED ring light tripod allows you to make changes to the height of the unit with a telescopic stand, as well as the angle of the LED ring light, having a ball joint at the top. You may have to make adjustments to accommodate different patient heights or when photographing different areas of the body, and it is almost impossible to replicate the adjustments of the tripod between sessions.
WHAT IS NEEDED?
To get the correct image exposure from a smart device, the area in front of the camera must be uniformly lit. An LED ring light will either produce flat light when photographing through the ring, or will partially illuminate the patient. Ideally, you need a dedicated lighting system that can illuminate the patient with two light sources from forty-five degrees. Not only will the camera correctly expose the image, but you will also see detail in the skin. This lighting system should be colour balanced to yield realistic skin tones. It should also be tall enough to capture any area of the body, so that you don’t have to adjust between sessions.
With this in place, you need an environment that you can replicate, and mark off distances and angles, so the patient and the lights are always in the same place. Most importantly, protect the photography area from changing outside light. Consistency is key.
REFERENCES
1. Nave, R, “Inverse Square Law For Light”, Hyperphysics,